Wednesday, August 20, 2014

DIY Customized Hanging File Labels (Free Download)

Anyone else have a love affair with office supplies?  Ahhhhh... a well-organized space! [Insert dreamy sigh] The only thing I disliked was figuring out the Avery templates to print my file folder tabs.  It took me time to find the right template, and sometimes it would get messed up in the printing process or I changed my mind about the titles I wanted on the labels.  It was never easy.

I decided to make my own.  I spent a little time experimenting with font and size.  I chose a simple black background with white font but it can be customized to your liking!  My favorite part is the font can be larger than what can fit on typical tabs and there is no need to wedge the paper into those stiff plastic tab holders.  Without fail, it seemed the corners would inevitably get bent or the paper would crumple when I tried to get them into those plastic tabs.  Here's my solution.

Click here for my Hanging File Labels template that you can download and then customize yourself!  If you end up using the template, please take a picture of your files and email it to me.  I'd love to see how yours turned out!  What colors and fonts do YOU want to use for your files?

Laminate the sheet of labels.  Folding them makes them thicker and more durable.

Cut and fold laminated tab before inserting.
A little touch of tape holds down the back.
Insert into hanging file slits.


Wednesday, August 6, 2014

Music Bulletin Board with Old Records

I'm loving my new bulletin board!  Thanks to my friends, Mitch and Jen Inouye for giving me the old records to use and to my daughter Lydia for helping me assemble the bulletin board.

Music classroom bulletin board
I can't forget to thank the inspiration for this... Kristen, a creative crafter from Kristen's Creations, who redid her son's room in a rock 'n roll theme and made a similar border for some artwork.  Check out the inspiration from Chase's Rock 'n Roll Bedroom.

My music classroom is mostly decorated in black/white colors with red, lime green, and yellow accents.  I wanted to carry over those colors when assembling this bulletin board, but I didn't have enough records in those particular colors.  In the end, I like how it turned out with the variety of colors.  I also didn't know if I would like the black bulletin board paper (since the records are black), but I do!

In order for the border to really pop, I chose to staple the bulletin board paper about 6" from each wall. Then we started by putting all the red records in the corners.  A simple thumb tack through the center hole of each record worked great!

You can see how the paper does not go all the way to the wall,
and you can also see my helper and soon-to-be 7th grader smiling in the mirror's reflection! <3
I put the corner records all the way to the edge of the wall, but not over the metal trim.  Then I measured 2.5" down from the edge for alternating records.

Measuring wasn't precise, but it helped even out the look of the alternating records.

Too bad I have a mirror and soap dispenser to work around, but I did my best by tucking the edges of the record behind them, but I did have to break/chip off some of that last record to make it happen. (You can look back at the finished product to see how it's wedged in there, not 2.5" from the edge.)  Oh well.  My perfectionistic tendencies will surely notice this every time I wash my hands in the sink!

As the Human League sang in 1986: "We're only human!.... Born to make mistakes!" 
It's not perfect, but it's perfect for what I could manage at the time!  I love looking at this wall in my music room.  It just makes me happy!

Wednesday, July 30, 2014

Ukulele Storage


I'm SUPER excited to have figured out a way to store and display the ukuleles in my classroom!  Prior to this solution, ukuleles were stored in an old milk crate and were difficult to get out and use.

The classrooms in our school have these hooks installed for student coats/sweatshirts, backpacks, book bags, etc.  As a music teacher, students come to my room without those, except for the coats and sweatshirts part.  Students usually keep their outerwear with them at their seat though, so the hooks were never used.  Space in my music classroom is at a premium, so I wanted to utilize this area.  Plus, I think it looks cool to have them organized and visible like this!  When I received my second set of ukuleles, my goal was to figure out how to hang them so they could be displayed and accessed by the students.

The trouble I found was:
  1. The double-hooks were too narrow and shallow to hold the uke necks without making some alterations.
  2. The number of hooks on the wall (30) made it difficult to hang the ukes flat, without hitting another hook.
I found some lovely ukulele trees, stands, hooks and DIY ideas on Pinterest.  I pinned several!  After watching this DIY video on how to make my own ukulele wall hanger, I set out to find the nearest Harbor Freight store which I had never set foot in before this. Once there I roamed the aisles and asked three different employees to help locate the U hooks.  I think the trouble was they aren't called U hooks.  Ooops!  I finally found the "heavy duty tool hooks," and they were exactly what I wanted.  You can find them here.  They LOOK like a "U hook" though, don't they?

My plan was to remove the existing classroom hooks from the wall and attach a long 2x4" board to the wall where I would screw in the heavy duty tool hooks.  I pondered this idea again as well the amount of work it would require while standing in the middle of the Harbor Freight aisle.  Somehow the enthusiasm I felt upon finding the hooks was now being replaced by the dread of tackling such a large job with very limited time.  Just then, the clouds parted and another product caught my eye.  Hmmm.  Could it work?

For a fraction of the cost I could buy 
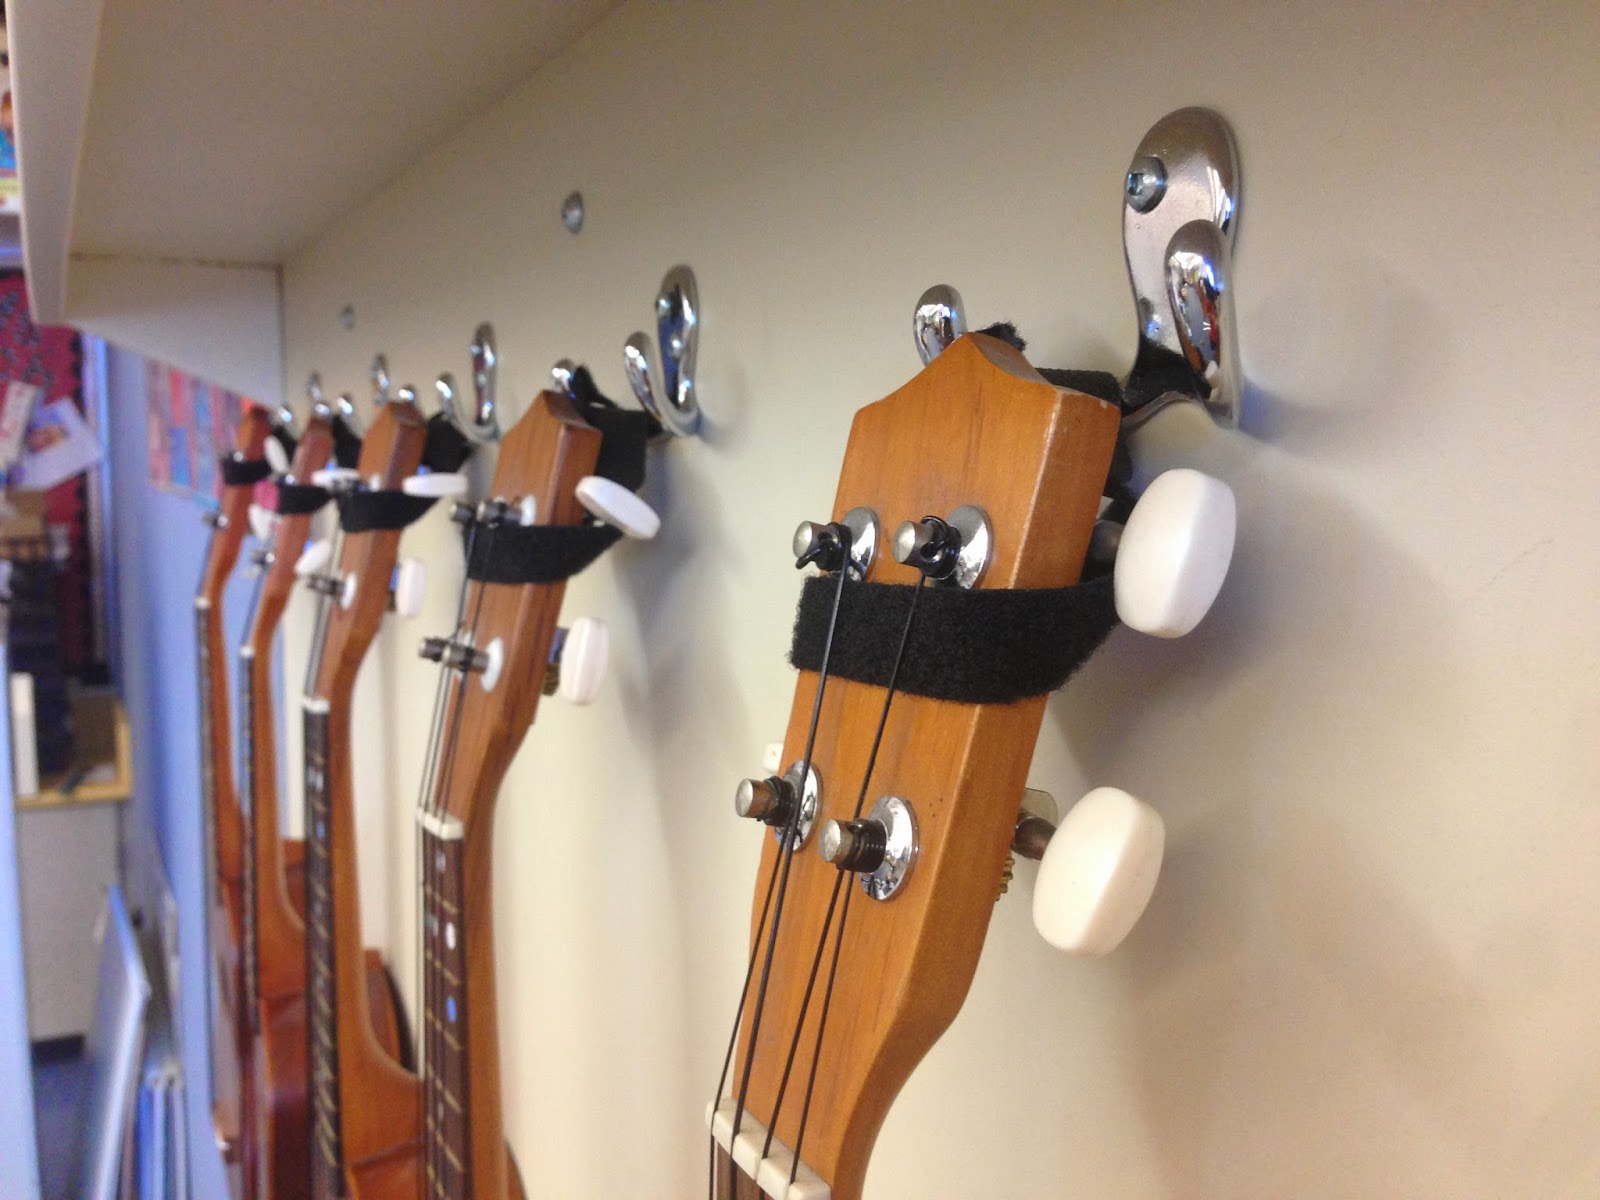
hook and loop cable ties, wrap them around the first set of tuning pegs, and hang them from the hooks! 

Slide the cable tie underneath the strings of the first set of pegs, and connect in back.
It hangs on ONE of the hooks, because the tie isn't long enough to wrap around both hooks.

This is what the package looked like from the store.
Hanging the top row of ukuleles went great!  I only had to maneuver each ukulele a little to avoid bumping into the hooks near the body.

The challenge came when trying to figure out how to hang the second/lower row, because the hooks did not line up in the right spots for the ukuleles to fit!  Grrrrr.  It had been going so well.  Fortunately, I was in MacGyver mode and thought about those Command hooks I had purchased for something else.

I measured how much space I'd need and began sticking the Command hooks in between the ukuleles above and the existing hooks below.  Good thing I read the directions that said to have them to adhere to the wall for at least an hour before hanging anything from them.  Anyway, as you can see they worked great!


I hope this helps if you are looking for a relatively simple way to access and display multiple ukuleles, too!


Friday, April 25, 2014

Earth Day/Arbor Day 2014

Students sing opening song "Earthlings, Unite!"

Earth Day/Arbor Day Celebration

Every year our school holds an Earth Day celebration.  This year it coincided with Arbor Day.  Our school celebration is a combined effort from both our science and music departments.  Since I teach at an environmental science magnet school, Earth Day is a big deal!

Currently, California is experiencing serious drought conditions so we’ve been learning lots of water conservation methods.  Ironically Mother Nature sent some rain on the day of our celebration, so for the first time in many, many years we celebrated indoors.  Besides parents as well as current and retired teachers, we had our district superintendent, city council members, representatives from our local water company, and volunteers from “Our City Forest” on hand for the celebration.

Songs students performed this year were:
  • “Earthlings, Unite!” by Teresa Jennings
  • “Song of One” from the Silver Burdett Making Music curriculum for Grade 3
  • “What Do You Do With a Water Waster?” Adapted; Arranged by Teresa & Paul Jennings; Adapted by Andrea Fennern & Monica Ulrich
  • “Agents of Change” by Teresa Jennings with bucket drumming composed by Monica Ulrich
  • “La La Tree Rap” by Andrea Fennern (a special composition created especially about the trees in our school’s outdoor classroom)
This was the first time I had created a bucket drumming rhythm that was to be performed for an audience outside of the music room!  Students who were interested in performing for the Earth Day celebration auditioned at lunchtime a couple weeks before the performance. 
5th grade bucket drummers
At our dress rehearsal, we quickly realized how LOUD the buckets were when hit with the drumsticks.  We fixed that easily by placing a mouse pad on the bucket to soften the blow and lessen the noise.  

Once I figure out how to upload a file to the blog, I would be happy to share the audio file I gave to the students on their practice CD as well as a printed document with lyrics and bucket drumming rhythms. Coming soon.... In the meantime, if you want me to email what I've created, feel free to contact me!

Additional pictures from the event can be seen on our district's Facebook page: Earth Day/Arbor Day Celebration 2014